The master is approved, and now it needs to exist in twelve other sizes by Friday. Some portrait, some landscape, one a strange wide banner, one a tall printed totem.
InDesign has more ways to help than most people use. Each is useful for some jobs and runs out of road somewhere. Here’s an honest tour, then how we approached the same problem in Mestra.
Option 1: Liquid Layout
Liquid Layout lets you set rules for how a page behaves when its size changes. Select the Page tool and choose a liquid page rule in the Control panel, or open the Liquid Layout panel from the Layout menu, then resize the page.
The full set of liquid page rules:
- Off: no rule, so nothing adapts.
- Scale: everything scales together, like resizing a picture.
- Re-center: content stays the same size and stays centred.
- Guide-based: you place liquid guides, and objects they cross resize. Text frames grow and the text reflows rather than scaling.
- Object-based: you set, per object, whether it’s pinned to an edge and whether its width and height can change.
- Controlled by Master: the page follows whatever rule its parent (master) page uses.
Where it works: small changes in size, and the same layout in a slightly different shape. A 1080 × 1920 screen to a 1080 × 1700 one, say.
Where it struggles: big changes in shape. A portrait poster to a 2:1 banner is a different layout. The headline needs to move beside the image, not get wider. Liquid Layout can pin and stretch, but it can’t decide that. Object-based rules also take real setup per object, in one document.
Option 2: Alternate layouts
Alternate layouts (Layout > Create Alternate Layout) add a new set of pages at another size inside the same document, built using the Liquid Layout rules. You can link the stories, so a change to the copy in the master can flow to the alternates.
Where it works: keeping several sizes together, with copy linked, so a text change is made once.
Where it struggles: the new pages are still made by the liquid rules, so a big change of shape still needs tidying by hand. And linked content can overwrite a tweak someone made on purpose.
Option 3: Adjust Layout
Adjust Layout moves and resizes page elements when the page size, margins or bleed change. You’ll find it under File > Adjust Layout, or as the Adjust Layout button in File > Document Setup.
Where it works: a quick resize to a nearby size, especially when the margins change.
Where it struggles: like Liquid Layout, it’s geometry, not judgement. It scales and shifts. It won’t restack a layout from portrait to landscape.
Option 4: Scripts
A good script can create a set of documents at fixed sizes, place the same assets in each and apply styles.
Where it works: repetitive, rule-based work that’s the same every time. If your campaigns all follow one template, a script can do a lot.
Where it struggles: campaigns aren’t always the same. The moment a headline runs long, a photo has a different focal point or a client wants the logo bigger, the script either needs a new rule or someone fixes the output by hand. Scripts also need someone to maintain them.
Option 5: Rebuild by hand
The old faithful. Make a new document at the new size, copy things across and lay it out again.
Where it works: everywhere. You get full control and a designer’s eye on every size.
Where it struggles: time, and the risk that comes with it. A dozen sizes is a dozen chances to paste an old price, miss the new legal line or forget the logo’s clear space.
Option 6: Adobe’s own AI features
Recent versions have generative tools too. InDesign 2025 (version 20) and later include two that matter here:
- Generative Expand extends an image to fill its frame. Drag the frame wider or taller and InDesign generates the extra picture around the original. It’s genuinely helpful when you change aspect ratio, especially for backgrounds and for filling bleed.
- Text to Image creates a new image from a written prompt, right in the document.
Where they work: making the picture fit the new shape, which is often the slowest part of a resize.
Where they stop: they extend or create pixels. They don’t lay the headline, copy, logo and legal line out again for each size. That part is still yours, or one of the options above.
What all of these have in common
Each method answers one of two questions well. Liquid Layout, alternate layouts and Adjust Layout answer “how do I change the geometry?” The generative tools answer “how do I make the picture fit?” Rebuilding by hand answers “what should this size look like?” Scripts sit in between, answering it once and then repeating.
The hard part of resizing is the second question, asked for every size: where the headline should go now, what to drop, whether the logo still has its clear space. That’s the part we wanted help with.
How Mestra does it in InDesign
Mestra is a panel inside InDesign (version 20.0, which is InDesign 2025, or later). You install it from Adobe Exchange, or from the .ccx file on the Apps page in the Mestra web app.
Here’s what happens when you run it:
- It checks the master. Mestra uses page 1 of the open document. A preflight stops the run if a link is missing or modified, a font isn’t installed, or the horizontal and vertical ruler units don’t match, or aren’t px, mm or pt.
- It reads your elements and gives each a role. Headline, subhead, body, CTA, legal, logo, icon, background or decorative. It guesses from the layout, so the largest text is the headline and a vector graphic is the logo, and you can change any role.
- It plans each format. You pick a campaign and tick the brands (the panel calls them Centres). Mestra plans a layout for every format in the campaign, using each format’s size, safe margin, bleed and minimum type size, and each brand’s logos, colours and rules. The formats can be any size: start from the built-in shopping-centre and social packs, or add your own in Setup > Formats > New format, in px, pt or mm. An unusual banner is planned the same way as a standard screen.
- InDesign builds it. The new layouts are built in InDesign from your master’s own elements. You choose a folder, and Mestra saves an
.inddand a PNG for each format, in a folder for each brand. - It checks and reviews. Each format is checked against the layout rules (text fit, overlaps, gaps and logo clear space), then Mestra looks at the exported image. Safe fixes are applied. Anything that needs a person is marked Needs a look, with plain-language notes.
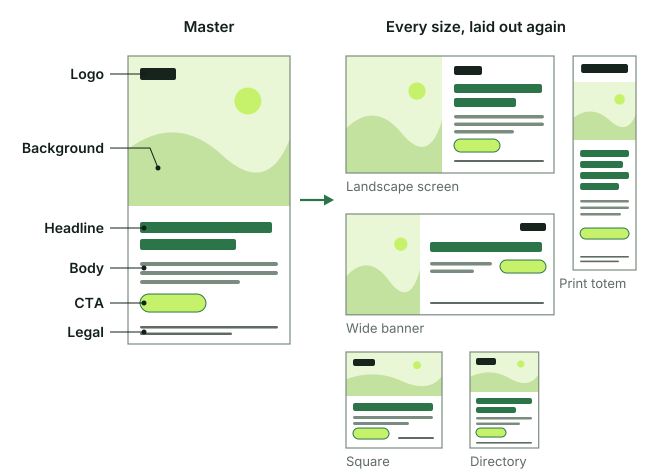
Figure 1. One master, every size. Each size is laid out again from the master’s own elements, each keeping its role.
The result is a set of real InDesign documents you can finish by hand.
The honest limits
- It needs InDesign. Mestra builds in your design app, so the panel runs where your designers already work.
- The panel exports
.inddand PNG. If a format needs a PDF or JPG, export it from InDesign yourself. - Very large formats may be built smaller. A big print format can be built at a lower dpi or pixel size because of a page size limit, and Mestra flags it when it does. Check those files before they go to print.
- Flags don’t go away on their own. There’s no dismiss button yet. You fix the file, or press Try again if a format failed.
- It doesn’t replace the designer. The master, the creative call and the final check are still yours.
Sources and notes
- Liquid page rules, alternate layouts (Layout > Create Alternate Layout) and Adjust Layout are documented in Adobe’s InDesign user guide at helpx.adobe.com. Menu names can shift between versions.
- Generative Expand: Extend images with Generative Expand in InDesign. It first appeared in InDesign 19.5 and Text to Image in 19.4, so both are in InDesign 2025. They need an internet connection.
- Mestra’s InDesign requirements, install and permissions: Install the plugin for InDesign.
- Adding your own formats, and what a format holds: Masters, formats and runs.
- What a run does: Run a campaign.
- What the Mestra panel in InDesign exports: Export and hand off.
- Flags and Try again: Fix a flagged format.